With fluctuating temperatures during the transition of summer into fall, choosing what to wear can become a difficult process. Luckily, the arrival of the pocket T-shirt made it just in time. While lightweight and comfortable, these shirts are also very trendy. Each T-shirt can be fitted with a pocket to add extra flare to a once-boring piece.
On campus, the shirts seem to make quite an impression on both guys and gals.
“Pocket tees are super cute and perfect for everyday casual wear,” Torrie Walker, freshman from Knoxville, Tenn., said.
This custom-made shirt can personalize an otherwise normal outfit into something special.
Recently, the pockets have begun to include various styles of monograms that include names or initials of the person wearing the shirt. The monogrammed pocket T-shirt has become an increasingly popular item among college sororities and clubs.
“They are cozy and laid-back but still classy,” Jordan Nicole Webb, sophomore from Memphis, Tenn., said. “Depending on the style of shirt, they can even be worn in a dressier setting than everyday wear.”
Sites such as Etsy and Fraternity Collection carry the T-shirts online so anyone can purchase them. However, students can find buying these shirts to be rather expensive. For that reason, most students only have one or two of the shirts.
Good news for them, though, it’s a very inexpensive craft to do at home. A do-it-yourself T-shirt not only saves money but it allows the individual to truly express his or her own creativity and style. This DIY project can be tackled in a matter of hours and at a price of less than $15 depending on the materials chosen. The monogramming would make the shirt cost a little more and would need to be done by a skilled seamstress.
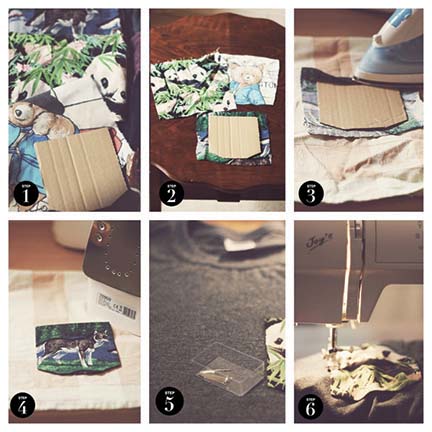
Steps:
1. First, make a pocket stencil from a piece of cardboard. The usual pocket size for the shirts measure 4-by-5 inches. The size of the pocket can vary depending on preference of the individual.
2. Place the cardboard onto the fabric. Begin to cut the fabric around the cardboard while leaving about an inch gap.
3. Fold the edges of the fabric around the cardboard and iron them down. The edges must be flat so the shape of the pocket will hold. Then remove the cardboard.
4. After the cardboard is removed, iron back over the fabric so all of the edges are folded under and a pocket has been made.
5. Make sure the T-shirt is placed onto a flat surface before stitching the pocket. The fabric pocket should then be pinned onto the shirt in the desired location. The location of the pocket can be on either side and the measurements are adjustable. Approximately 6 inches below the collar and 2 inches from the armpit seam is a reasonable starting position.
6. Using a contrasting thread, sew around three sides of the pocket, leaving the topside untouched. The sewing can be done by either a machine or by hand. Take extra caution when sewing by hand so the material does not bunch up.
Story by Katrina Yarbrough, Contributing Writer
nice,…<a href ="http://www.streetdirectory.com/businessfinder/company/2273/">Custom Made Shirts</a>